Avalanche safety was one of my favourite topics during the course because understanding how NOT to get in an avalanche is a bit like doing research: there are a lot of variables and not a straightforward conclusion. A good understanding of avalanche safety will help you make the decision “do I get out there today?”.
Why is it important to understand avalanche terrain? A case study
Let’s start with a case study from our instructor Paul Rogers.
“On the first day of spring in 1989 I found myself, with my climbing partner, on the surface of a moderate slab that pulled out of Separation Col, near Mt D’Archiac. The slab began to break up and we both sank into the darkness. I thought I was finished until bright light and a blow to my head saw me tumble out of the bottom of the avalanche and into the icy jaws of a crevasse! I’d ditched my pack and lost my ice axe in the churning darkness so when I hit the bottom of the crevasse I was pitched forward and tumbled further down into a separate cavern. Gasping for air, I was confronted by complete silence, save my pounding heart. Fortunately, my crampons were still on my feet. I walked, zombie-like, along the base of the crevasse until I reached the end and climbed out, using my bare palms on the icy walls. Having front points was my saving grace, as they provided my only chance of scaling the blue ice-wall. Adrenalin disguised the pain of my broken ribs and bruised face and delivered energy to get the job of self-rescue done.
Once out of the crevasse, I ran down to my pack, which was on the surface 100 metres away. I grabbed my shovel and switched my avalanche transceiver to search. I got no signal. The avalanche debris wasn’t deep enough to hide my partner so I down-climbed back into the crevasse, where I picked up a strong signal. I started digging and continued to dig until I found a backpack, then a hand, an arm and a shoulder. Finally, his head appeared. As I clawed a plug of snow from his mouth, I knew his last breath had been taken a long time ago. He had been buried two metres down, in snow that had set up like cement—too much for me to dig him out in time.”
There you have a terribly sad and scary yet real scenario that beginner mountaineers must learn to try to avoid.
Types of avalanches
There are 3 types of avalanches to look for:
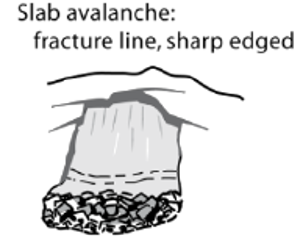
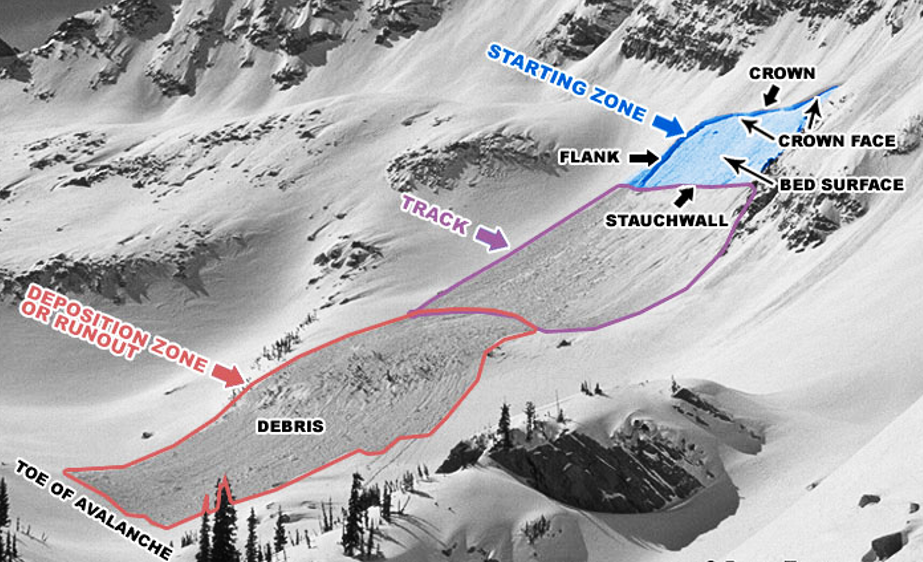
- Slab avalanche. A fracture line (crown wall) occurs on a slope (commonly 30 to 45 degrees inclination) and the snow below it slides down the mountain by gravity. Generally, there are a couple of requirements for a slab avalanche to happen: 1) there is a weak snow layer underneath a harder layer in the snowpack (so the harder layer detaches and slides on the weak layer), 2) there is a load (new snow/rain, human weight) that triggers the avalanche.
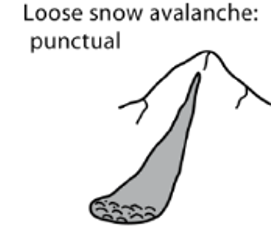
- Loose snow avalanche. Snow (especially fresh snowfall) detaches from one point and fans out down the mountain. The main trigger is the sun.
- Ice cliff / ice fall avalanche. They happen in steep unstable ice walls (blue ice may indicate unstable) and steep icy-rocky walls. They are triggered by gravity, temperature changes (ice melting), or debris / ice falling from above.
How to do an avalanche risk assessment
Terrain: Angle, Aspect, Weak points, Terrain traps
Snowpack condition: Activity, Signs of instability, Loading, Temperature, Wind
- Terrain 1: Angle. As a general rule for slabs:
😊 < 25 deg
☹ = 30 – 45 deg
😊 > 55 deg (but frequent sluffing)
Lose snow and ice cliff avalanches may happen in any terrain.
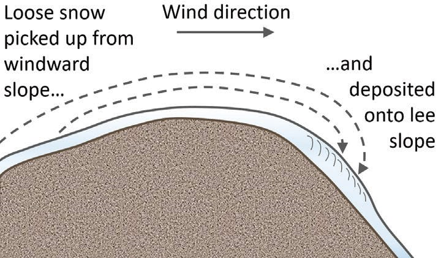
- Terrain 2: Aspect. The aspect is determined by the SUN (sunny or shaded) and the WIND (lee or windward). Lee slopes are more dangerous because the wind picks up snow on the windward side and deposits it on leeward side. Solar aspects are more dangerous because the sun triggers loose snow avalanches (especially in summer and spring when sun is hot), but shady slopes produce more slabs in winter.
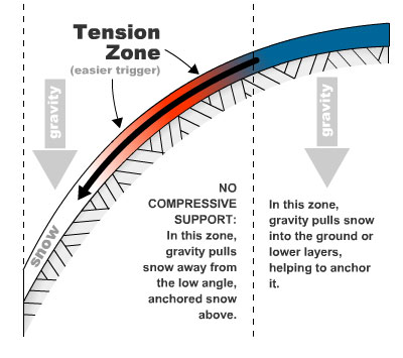
- Terrain 3: Weak / trigger points. Look at the shape of the terrain. Convex rolls and unsupported slopes create tension underneath them, increasing the risk of fractures in the snowpack.
- Terrain 4: Traps. The end zone of the avalanche is the runout (where you may likely end up if caught). Look below you. Are there crevasses, gullies or a cliff you may fall into/from, or is the runout free from terrain traps?
- Snowpack condition 1: Recent Activity. Are there sigs of avalanche activity? This is one of the best predictors of future avalanches.Signs: visible debris in runout zones, visible crowns, etc.
- Snowpack condition 2: Signs of Instability. Are there signs of instability in the snowpack? Cracking around the tracks, whoomphing sounds in the snow, a hollow feel when walking, angular shaped crystals that don’t clump together, a thin layer of crystals in the pack, snow falls rolling downhill, etc. If so, your body weight may load the unstable snowpack enough to create an avalanche.
- Snowpack condition 3: Loading. How have the precipitations been the previous days? Fresh snowfall followed by sun or rain is a bad sign. If there is a front bringing heavy snowfall and the next day the weather is clear, watch out!
- Snowpack condition 4: Temperature. Rapidly changing (especially rising) temperatures are dangerous. It’s important to know the freezing level (FL) to know at what altitude the precipitations will freeze, give soft snow, or remain as rain. On the way back from the summit, it’s possible to wait for a few hrs for the snow the refreeze again once the sun sets.
- Snowpack condition 5: Wind. Were there strong winds prior to your summit day that may have loaded lee slopes dangerously? For reference, winds under 20 km/h are generally soft, around 40-50 km/h walking gets difficult, at 80 km/h you may get blown over, at 100 km/h you’ll be crawling.
As a take home message, you must try to collect info on the forecast for the days before your summit day, not only for your summit day. Knowing the old-new snowpack interface is critical to assessing avalanche danger.
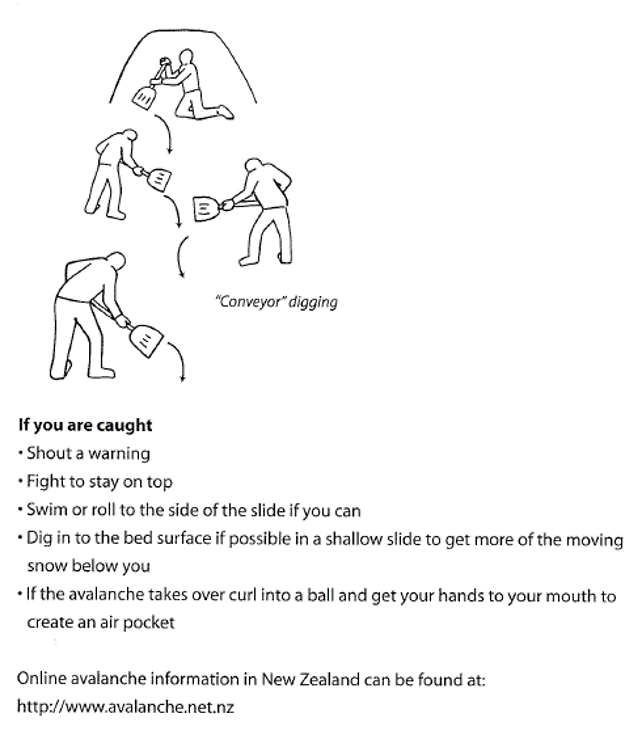
What to do if there is an avalanche
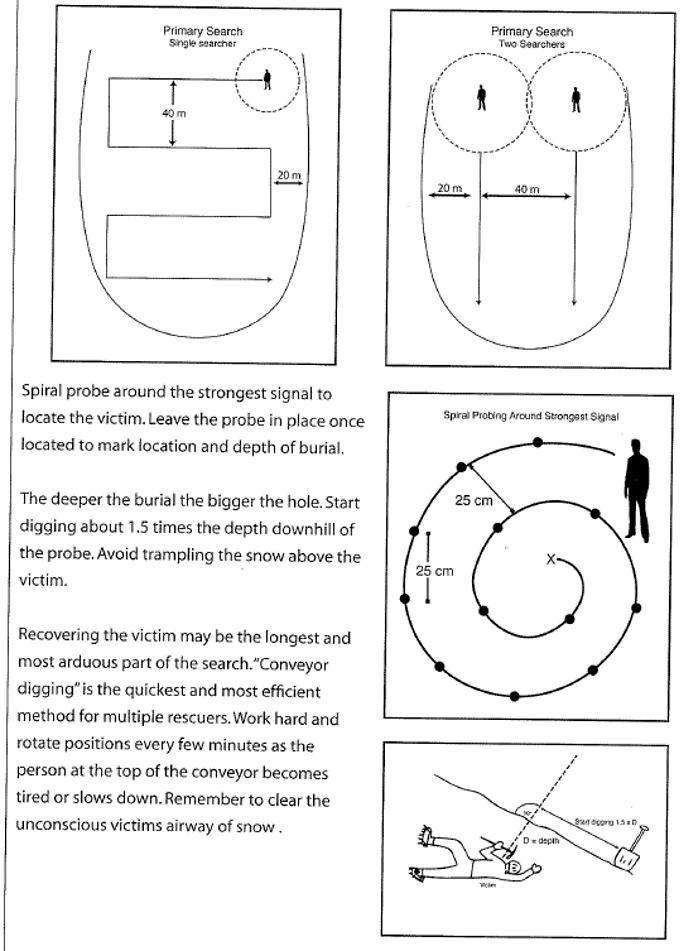
Your team has the best chances of digging you out alive, so only expose 1 person to danger at the time if a slope looks suspicious. Using the search mode in your transceiver, locate the buried person and dig them out. There are 80% chances of surviving if you dig them out within 10 min, dropping to less than 20% chances after only 30-35 min. So be ready and be quick.
A good way to reduce exposure to avalanche risk is to have an alpine start, because the snowpack is more stable between midnight and midday. Start early (1-2-3 am), move faster over better snow, have less wind (generally wind peaks up in the morning), summit to see the sunrise, and make sure you can keep it together long enough to get back safely.
See you in the Southern Alps!